
Once you navigate to the merge section you’ll see the tools below. Keep in mind this toolbar is updated from time to time with features and settings to give you more options as to how you can merge your files.
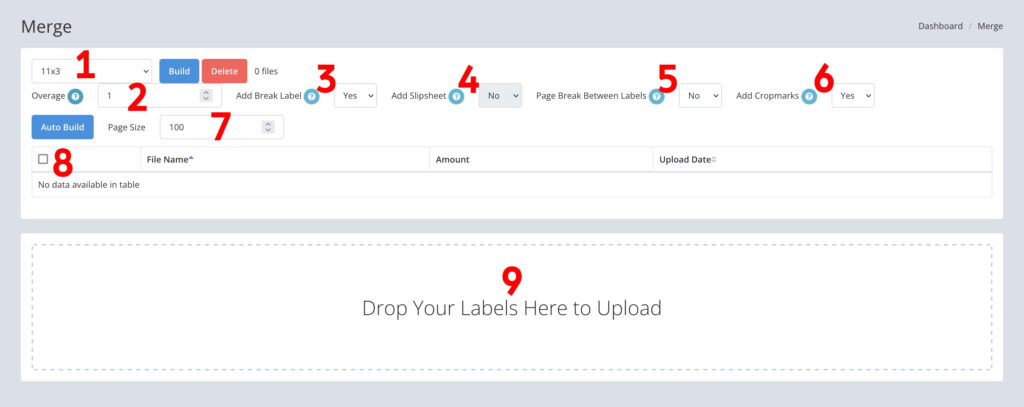
- Template drop down selector
- Overage, enter in the amount of overs you want when you merge your files.
- Add a break label. This is a low resolution copy of the file with a thick read boarder and the file name imposed in the middle. This is very handy when merging large quantities of files in cut and stack. With the break label you can easy sort and find the start of one file and the end of another.
- Add a slip sheet. A slip sheet is a custom file you can upload and when this setting is on it will place one slip sheet after the break label (if that setting is on) and before the main file you are merging. This is a great feature if you’re looking to insert coupons, customer messages, instructions, etc.
- Page break between label. This is the merge style. See this page for a detailed explanation.
- Add crop marks. Pretty self explanatory.
- Page size. This is the amount of pages the system will build if you input a value here. For example if you are merging a big batch of files but your printer can only fit 100 pages in for bindery then you need this setting. *Note that this won’t always be exact. The system will build as close to that number as possible while maintaining an efficient build. Please contact us if you have further questions.
- Select square. Checking this will automatically select all the files uploaded into that template.
- Web FTP. Drag and drop your files right in the browser to get them uploaded. Traditional FTP credentials are found at the top right corner under your email.